Boxers will face more hand injuries than other single type of injury over the course of their career. Because there are so many small bones in your hand, it is absolutely imperative that you take every precaution available to protect them. Proper hand wrapping is the best method of preventing an injury that could keep you out of this great sport. We recognize the importance of protecting your hands and have provided the following instructions to teach you the proper method using a standard hand wrap.
Please keep in mind that this is a general guide and other methods do exist. We feel that the method below is a good starting point and covers all the basic points of proper hand protection.
Step 1
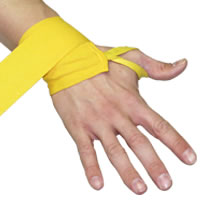 Your hand should be held open in a relaxed position, with your fingers spread apart. Begin by placing the hand wrap thumb loop around your thumb and be sure that the ‘This Side Down’ text on the hand wrap is against your skin. Bring the wrap across the back of your hand and wrap around your wrist 2 or 3 times.
Be sure to wrap high enough (2″ to 3″ up from your wrist joint) on the wrist to maximize support. You want to keep the hand wrap snug throughout this process, but not so tight that it will cut off your circulation.
Step 2
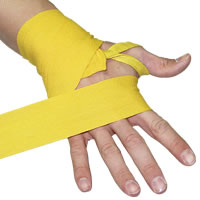 From the thumb side of your wrist, bring the wrap across the back of your hand, around the edge of your hand on the pinky side, across your palm, then then back up to the back side of your hand and across the top of your knuckles.
Step 3
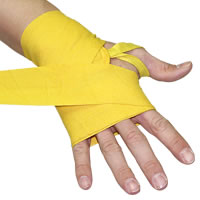 Wrap around the knuckle area 2 to 3 times. From the top of your knuckles, wrap across the back of your hand toward your wrist and around. This will create an ‘x’ pattern across the back of the hand. Repeat the ‘x’ pattern 2 or 3 times.
Step 4
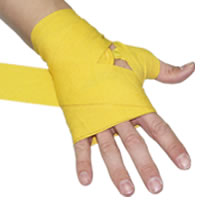 Continue around the palm of your hand to the base of your thumb. Wrap completely around your thumb and back toward your wrist on the palm side of your hand.It is important to keep the wrap from twisting while wrapping the thumb.
Step 5
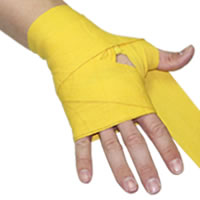 Continue wrapping around the back of your hand to the thumb and once again wrap around your thumb, this time from the opposite direction.
Step 6
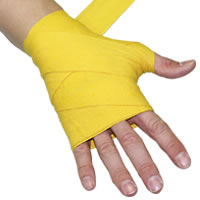 Wrap from the thumb over the back of your hand and around your wrist.
Step 7
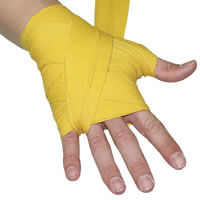 Continue around your wrist, over the back of your hand and through the space between your pinky and ring fingers. Wrap around your palm back toward your wrist and repeat the steps for each finger.Be sure to keep the wrap as flat as possible and twist free.
Step 8
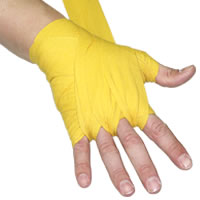 With the last finger completed, bring the wrap across the palm back toward your wrist.
Step 9
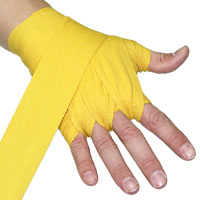 Continue wrapping across the back of your hand toward your knuckles.
Step 10
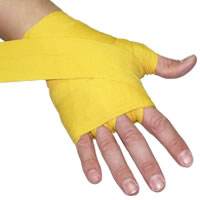 Wrap once more around the top of the knuckles and across the back of your hand toward your wrist.
Step 11
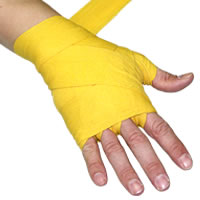 Secure your wrist with the remaining hand wrap. Be sure to wrap it snugly to provide support for your wrist.
Step 12
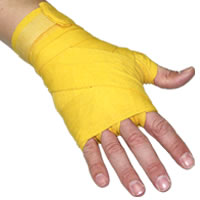 Fasten the Hook & Loop closure and you’re done.
Finish
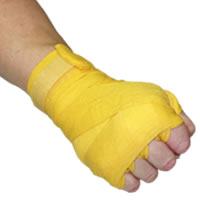 The finished product should be a secure and protected tightly wrapped hand.
NOTE: This article appeared on our old site and was lost when we upgraded a few years ago. Our customers and coaching partners frequently asked us to bring it back. Now that our blog is up and running again, we went out and found an archived copy of the old post and recreated it here.


Honestly, I think this is a matter of preference. We create the X over the back of the hands in step 3, after wrapping the knuckles. You’re suggesting that it would be better create the X before wrapping the knuckles. As far as I can tell, there isn’t any definitive answer as to whether one is objectively better than the other.
For anyone who’s unsure of which way to do it, try it both ways and see which feels better/more secure.